How This All Started
I figured we could grow with an all-in-one box for a long time. But one day, builds started failing, and both the times that builds would last before failing and the steps that would cause failure were never consistent. In this case, a Spark-based project that uses Gradle as its build tool was choking. First things first… let’s check out the build logs: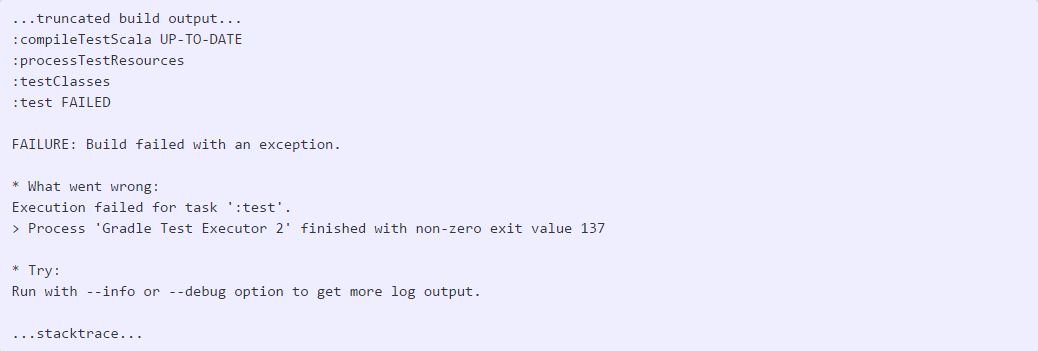 Odd. Let’s check the host and see what dmesg (and/or kern.log) have to say about this:
 We seem to have found the murderer. To corroborate the evidence, searching around reveals this in the Jenkins Wiki:
In cases where virtual memory is running short the kernel OOM (Out of Memory) killer may forcibly kill Jenkins or individual builds. If this occurs on Linux you may see builds terminate with exit code 137 (128 + signal number for SIGKILL). The dmesg command output will show log messages that will confirm the action that the kernel took.
We seem to have found the murderer. To corroborate the evidence, searching around reveals this in the Jenkins Wiki:
In cases where virtual memory is running short the kernel OOM (Out of Memory) killer may forcibly kill Jenkins or individual builds. If this occurs on Linux you may see builds terminate with exit code 137 (128 + signal number for SIGKILL). The dmesg command output will show log messages that will confirm the action that the kernel took.
 We’re using GitLab CI, not Jenkins, but this still makes sense. The build is utilizing enough resources that the host decides the process has to go. Since gitlab-runner is a separate process, thankfully only the build fails and not GitLab itself. Still, this is not ideal. If enough resources are getting used that the OOM Killer is doing its thing, then we may be getting to a point where builds are going to start affecting GitLab performance, including never finishing at all. We don’t want that. After some back and forth with the developer to see what was going on with the tests (and there was a lot happening), it became clear that we weren’t able to strip the build down enough to make it work on the current host.
Time for Migration
So now comes the time to offload the builds to a separate host. Things have changed since we last added resources for Gitlab. Our current host is an Amazon Web Services EC2 instance of m3.xlarge type. To give the runner host a little bit more horsepower, we’re going to utilize a newer m4.* instance type. However, arbitrarily spinning up new instances for builds can get expensive. Expenses matter, but so do working builds, so we need to find a middle ground. GitLab’s documentation is spread out over multiple documents. After reviewing them, I devised a plan: use gitlab-runner’s ability to harness Docker Machine to help manage aspects like schedule and spot requests to help us get the best of both worlds. Docker Machine can use many different drivers to back the machines it spins up. Since we’re working within AWS, we decided to move forward with the AWS driver.
Now is a good time to consider your security posture. I mention this because your GitLab instance is going to need to talk to the runners over the network, so consider the sensitivity of your projects and communication between nodes when moving forward. This has implications on the AWS security groups you’ll need, your DNS configuration, and other networking factors. For example, we keep the EC2 resources that we want segmented away from public traffic in a VPC called services. Your environment is likely different, so consider what works best for your situation.
DNS
On the subject of DNS, we use a BIND DNS service for clients within our network. For our AWS resources, we give public domains A records that point to the instance’s public IP address via Route 53. Why does this matter? If GitLab (or any other client) resolves the domain you’re using to a public IP address, you’ll need to modify your security groups to reflect the use of a public address or point the instance to your internal DNS server for communication over a local network.
AWS Security Groups
Docker Machine will attempt to use a default security group with rules for port 2376, which is required for communication with the Docker daemon. In my opinion, it’s easier to create a security group with the rules you need and provide that when you spin up the runner. This way you can customize it to your liking ahead of time based on your networking environment.
Getting Credentials
You’ll need an AWS Access Key tied to a user with permission to scale (EC2) and update the cache (via S3). I created a gitlab-scaler IAM user with policies for EC2 (AmazonEC2FullAccess) and S3 (AmazonS3FullAccess). You can dial this back to be more specific if that doesn’t work for your organization. I disabled console login and grabbed the security credentials for this user. We’ll use this later during runner configuration.
GitLab’s documentation is spread out over multiple documents. After reviewing them, I devised a plan: use gitlab-runner’s ability to harness Docker Machine to help manage aspects like schedule and spot requests to help us get the best of both worlds. Docker Machine can use many different drivers to back the machines it spins up. Since we’re working within AWS, we decided to move forward with the AWS driver.
Now is a good time to consider your security posture. I mention this because your GitLab instance is going to need to talk to the runners over the network, so consider the sensitivity of your projects and communication between nodes when moving forward. This has implications on the AWS security groups you’ll need, your DNS configuration, and other networking factors. For example, we keep the EC2 resources that we want segmented away from public traffic in a VPC called services. Your environment is likely different, so consider what works best for your situation.
DNS
On the subject of DNS, we use a BIND DNS service for clients within our network. For our AWS resources, we give public domains A records that point to the instance’s public IP address via Route 53. Why does this matter? If GitLab (or any other client) resolves the domain you’re using to a public IP address, you’ll need to modify your security groups to reflect the use of a public address or point the instance to your internal DNS server for communication over a local network.
AWS Security Groups
Docker Machine will attempt to use a default security group with rules for port 2376, which is required for communication with the Docker daemon. In my opinion, it’s easier to create a security group with the rules you need and provide that when you spin up the runner. This way you can customize it to your liking ahead of time based on your networking environment.
Getting Credentials
You’ll need an AWS Access Key tied to a user with permission to scale (EC2) and update the cache (via S3). I created a gitlab-scaler IAM user with policies for EC2 (AmazonEC2FullAccess) and S3 (AmazonS3FullAccess). You can dial this back to be more specific if that doesn’t work for your organization. I disabled console login and grabbed the security credentials for this user. We’ll use this later during runner configuration.
Configuring the Runner
Now that we’ve got our cloud settings tuned to our liking, it’s time to configure gitlab-runner to use the new configuration. Start by installing or updating the runner service. Our environment uses Ubuntu 16.04 instances on EC2-backed hosts, so your mileage may vary. For other platforms, check out the docs. Installation Add the GitLab repo and install the runner: $> curl -L https://packages.gitlab.com/install/repositories/runner/gitlab-ci-multi-runner/script.deb.sh | sudo bash $> sudo apt-get install gitlab-ci-multi-runner Minor Opinionated Derail: curling scripts from the internet is always a risk, especially when the instructions have you pipe it directly to sh. Make sure when following instructions like these (which I’ve copied from the official GitLab docs) that you trust the host and you can take that a step further by navigating to the resource manually in the browser and checking out the script before you run it. It is convenient, but I am not a fan. Register the runner. You’ll need a registration token for this step. You will likely want to use a Shared runner so that all of your projects can use this autoscaling setup, not just a Specific runner which is tied to a project’s scope. $> sudo gitlab-runner register Follow the instructions generated by the command, which will prompt you for the token we just mentioned and some other information. I won’t regurgitate all of the steps here, but the steps for installing a runner in your environment are available as part of the official GitLab documentation. When prompted for the executor, we’re looking for docker+machine. Configuration The registration step above should create (or update, if you already had runners) a configuration file at /etc/gitlab-runner/config.toml. We’ll take this in sections to better discuss why each parameter is needed. Let’s start with the top section - concurrency. We want up to three concurrent builds at once. You can alter this based on your organization’s needs and cost tolerance. concurrent is part of a formula that helps determine the upper limit of the number of instances you will use. Next, we’ll tackle the runners.
 We had multiple problems with the GitLab runner’s DNS resolution, which is written in Go. After some furious Googling, we devised the environment configuration you see above. It forces Go to use the ‘native’ resolver instead of its built-in resolver. output_limit is increased to allow you to dump up to 16MB of logs into the console (instead of the default 4MB). The token should be the one you used as part of registration. limit is part of the aforementioned formula used to determine your upper limit. Let’s move on to our Docker settings.
 We’re using the default image of ruby:2.1, but in most cases, each of our build configs (in .gitlab-ci.yml) specify their own image. We have privileged turned on to allow the Docker containers to access the hosts Docker daemon for builds. To accommodate our DNS setup, we had to specify that any references to our gitlab.* and nexus.* domains should be routed internally. Now that we have that in place, let’s configure a cache.
 This one is pretty straight-forward. The only Type supported by GitLab CI at the moment is S3 (to include S3-compatible APIs). We’re going to use AWS, thus our ServerAddress. Your AccessKey and SecretKey are the credentials for the IAM user you created. The BucketName is the S3 bucket that will be used to store the cache. For our deployment, I had to manually create this bucket, but again - your mileage may vary based on when you’re running this. BucketLocation is the region that bucket is located in, and Shared means that all runners use the same bucket and folder structure enabling them to use cached items from other build steps. You may want to disable this if you want a totally fresh build each time, but it has helped improve performance in our setup. The next section helps us determine our level of concurrency and control more of Docker Machine.
 Now this is where things start to get interesting. We want at least one machine “hot” (ready for builds) during business hours, specified in our IdleCount. We’re cool with our hosts being idle for up to 30 minutes (because we’re using spot instances), specified in IdleTime. To rotate hosts to keep build machines “clean”, we only want each one to run 100 builds before starting a new instance and terminating the old one (MaxBuilds). For example, GitLab.com only uses one to keep builds sandboxed. The MachineDriver that should be used by Docker Machine is AWS EC2. To make sure everyone knows these machines are the runners, we specify a MachineName which will tag the spawned instances. Since our after-hours requirements are much less demanding, we specify our OffPeakPeriods to say that 7:00 PM to 7:00 AM is “after hours.” We don’t need any idle machines during those hours (OffPeakIdleCount) and will stop the idle instances after a more aggressive cooldown of 20 minutes, set in OffPeakIdleTime. Finally, these are the parameters we’ll pass through to Docker Machine.
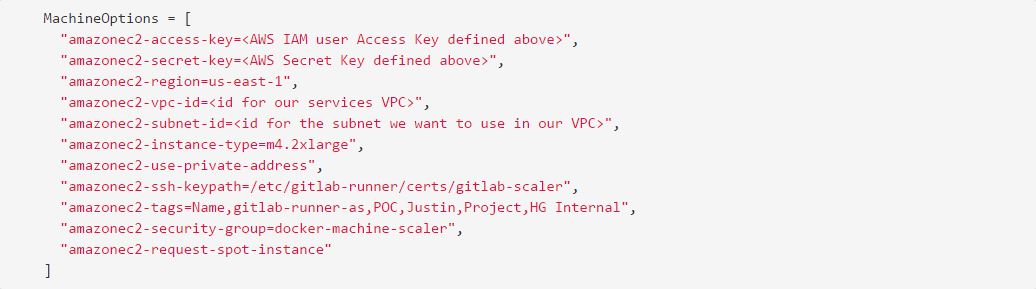
 The MachineOptions parameters will be passed through to that driver (as if one was running docker-machine on the command line). Our VPC and Subnet IDs are needed to tell docker-machine where to place our EC2 instances. We want to take advantage of awesome new instance types like m4.2xlarge. We want everything to use a private address to keep traffic internal. I’ve specified the keys that should use (docker-machine will make new ones if you don’t). We throw some tags on to help identify the instance, assign it the security group that we defined earlier, and last (but not least): spot instances! We get to harness the power of better instance types at a fraction of the cost, and they only live as long as we need them. This works out much better for everyone.
Worth Noting: If you specify amazonec2-private-address-only as one of the machine options, your EC2 instance won’t get assigned a public IP. This is fine if your VPC is configured correctly with an Internet Gateway (IGW) and routing is fine, but it’s something to consider if you’ve got a more exotic configuration.
It’s Not All Roses…
While so much of this awesome (moar power, moar cheaper), it isn’t without its issues.
The MachineOptions parameters will be passed through to that driver (as if one was running docker-machine on the command line). Our VPC and Subnet IDs are needed to tell docker-machine where to place our EC2 instances. We want to take advantage of awesome new instance types like m4.2xlarge. We want everything to use a private address to keep traffic internal. I’ve specified the keys that should use (docker-machine will make new ones if you don’t). We throw some tags on to help identify the instance, assign it the security group that we defined earlier, and last (but not least): spot instances! We get to harness the power of better instance types at a fraction of the cost, and they only live as long as we need them. This works out much better for everyone.
Worth Noting: If you specify amazonec2-private-address-only as one of the machine options, your EC2 instance won’t get assigned a public IP. This is fine if your VPC is configured correctly with an Internet Gateway (IGW) and routing is fine, but it’s something to consider if you’ve got a more exotic configuration.
It’s Not All Roses…
While so much of this awesome (moar power, moar cheaper), it isn’t without its issues.
- Spot Instancesare temperamental things. If your region runs out of Spot capacity and docker-machine gets rejected by AWS, you’re going to have a lot of stuck builds. Mitigation? Either weather the storm, do some cross-region wizardy, or go back to the more expensive version by removing the amazonec2-request-spot-instance
- Roles: it would be nice to do a lot of the things we’re doing with an IAM user with roles instead.
- Docker on Dockerbuilds are still a requirement for our organization, which allows containers to use the host’s Docker daemon which can be hard to debug sometimes. Mitigation? Endure privileged mode or create a separate shell runner to run Docker builds. One thing to remember if you go with the shell runner is that you’re still running on the GitLab host. You want to separate your build into stages to ensure that all your Dockerfile is doing is using COPY to put resources in the container instead of building them (with webpack or some other build tool).